Lập trình Spring Boot CRUD đơn giản MyEmployee
Link Source: Lập trình Spring Boot CRUD đơn giản MyEmployee
Thể loại: Java, Lập trình
Tags: Lập trình, Spring Framework
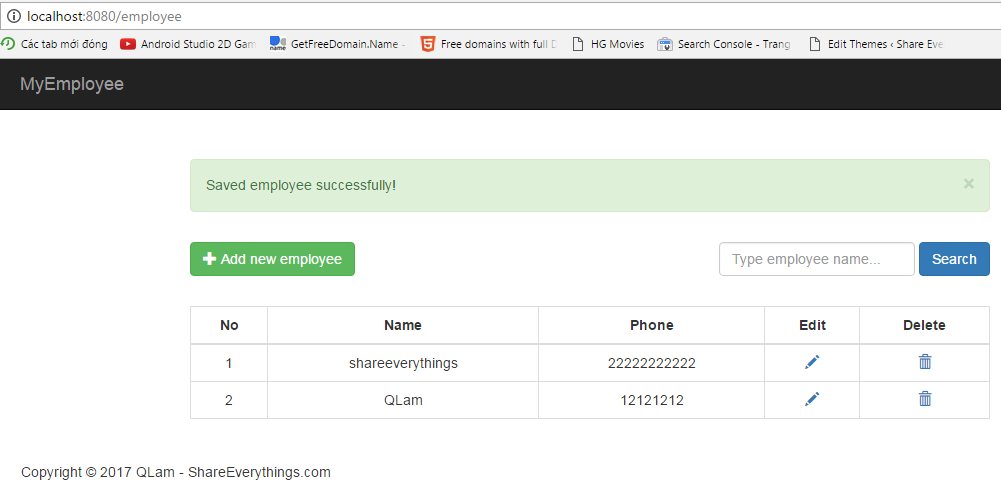
Hướng dẫn lập trình Spring Boot CRUD (thêm, đọc, xóa, sửa) cơ bản. Project MyEmployee này sẽ hướng dẫn làm trang web trên nền Spring Framework chỉ có các tính năng đọc thêm xóa sửa các nhân viên đơn giản. Đây là dự án kết hợp Spring Boot + Spring MVC + Spring Data Hibernate + Thymeleaf Template engine
Yêu cầu công cụ(hoặc công cụ lập trình khác tương tự):
Elipse + Plugin spring suite tool
Java + Tomcat
MySql
Các bước lập trình Spring Boot CRUD làm như sau ( để chi tiết hơn hãy xem video cuối bài )
Ở đây mình sẽ tạo database là myemployee có 1 bảng employee. Trong bảng này sẽ có 3 cột: id, name, phone. Đoạn code tạo bảng:

File -> New -> Spring Starter Project
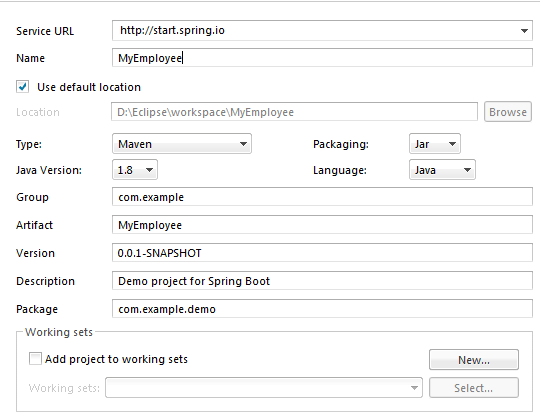
Nhập Group và Artifact tùy ý bạn. Ở đây mình nhập: Group là com.example, Package là com.example.demo và Artifact là MyEmployee
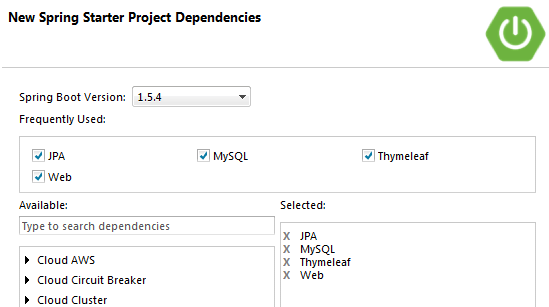
Nhấn Next, bây giờ ta sẽ thêm các thư viện: nhập “web” để tìm thêm thư viện Spring boot trên web. Tương tự nhập: “JPA”, “MySQL”, “Thymeleaf” để thêm chúng vào project.
Nhấn Finish
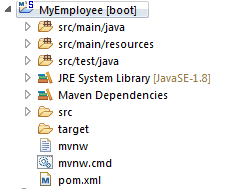
Project sẽ được build. Sau khi tạo project xong sẽ có cây thư mục như hình.
Trong dự án này, mình sử dụng Bootstrap 3.3.7 và jQuery 1.12.4 nên chúng ta sẽ thêm vào pom.xml như sau:
Lúc này file pom.xml sẽ có nội dung thế này, bao gồm đã thêm thư viện Bootstrap và jquery (phần hightlight)
Thiết lập file application.properties với hibernate và thymeleaf như sau:
Chúng ta cần lưu ý đoạn code kết nối tới cơ sở dữ liệu này. Bao gồm database và user, password kết nối tới mysql server
Bắt tay vào tạo class thôi! Do project Spring Boot CRUD chúng ta làm theo mô hình Spring MVC nên cần có các phần (package):
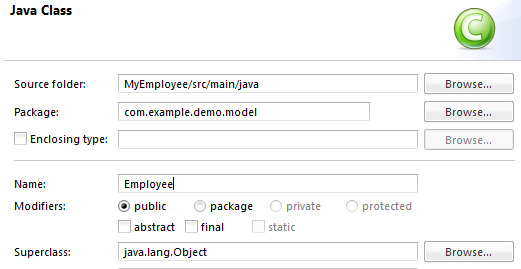
Nội dung tương ứng với bảng đã tạo bên cơ sở dữ liệu như sau:
Tiếp theo chúng ta tạo class EmployeeRepository.java trong package com.example.demo.repository
Nội dung EmployeeRepository.java được extends CrudRepository như sau:
Tiếp đến chúng ta tạo interface EmployeeService.java và class EmployeeServiceImpl.java implements từ interface EmployeeService.java trong package com.example.demo.service
interface EmployeeService.java
class EmployeeServiceImpl.java
Cuối cùng chúng ta tạo class EmployeeController.java trong package com.example.demo.controller
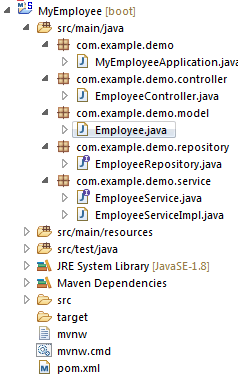
Sau khi xong chúng ta sẽ được cấu trúc thư mục như thế này
Phần xử lý đã xong bây giờ chúng ta sẽ viết phần view. Các bạn thêm thư mục và các file html như hình trong thư mục src/main/resources
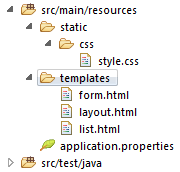
Chúng ta cần các trang: hiện danh sách nhân viên, trang thêm/sửa nhân viên. Ở đây chúng ta sẽ viết 3 file html chính: layout.html, form.html, list.html. Đồng thời thêm css cho giao diện trang web đẹp chút là file style.css trong thư mục static/css
Để tối ưu code giao diện view mình sẽ dùng fragment của thymeleaf nên chúng ta sẽ viết các phần như head, header và footer chung cho tất cả các trang và bỏ vào file layout.html
Nội dung layout.html
Mình giải thích chút về đoạn code trên (1 phần thôi còn lại tương tự nhé)
Do bootstrap và jquery mình dùng file jar (nằm trong maven dependencies của project) nên sẽ có đường dẫn như sau
Trang list.html sẽ là trang chủ và hiện danh sách nhân viên. Đồng thời hiện thông báo khi thêm/sửa/xóa nhân viên.
Nội dung list.html
Mình giải thích chút (1 phần thôi còn lại tương tự nhé)
Nội dung form.html
Mình giải thích chút (1 phần thôi còn lại tương tự nhé)
Mỗi thuộc tính của employee sẽ tương ứng với một input trong form. Nên mình sẽ thêm thuộc tính
Nội dung style.css
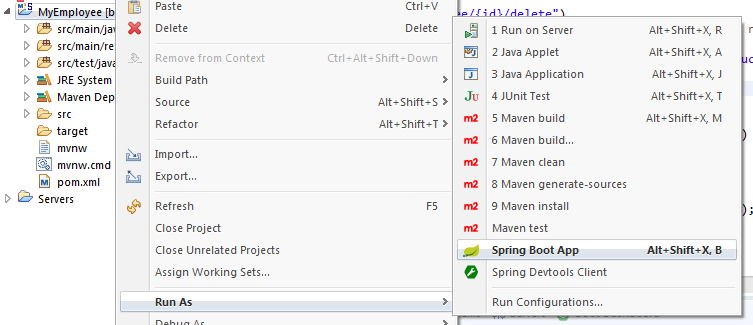
Xong. Mọi thứ đã ổn chạy chương trình thôi nào ! Nhấn phải project chọn Run as -> Spring Boot App. Vào trình duyệt web gõ: localhost:8080/employee (hoặc cổng port của bạn). “/employee” do bạn đã thiết lập trong controller.

Link Source: Lập trình Spring Boot CRUD đơn giản MyEmployee
Thể loại: Java, Lập trình
Tags: Lập trình, Spring Framework
Lập trình Spring Boot CRUD đơn giản MyEmployee

Hướng dẫn lập trình Spring Boot CRUD (thêm, đọc, xóa, sửa) cơ bản. Project MyEmployee này sẽ hướng dẫn làm trang web trên nền Spring Framework chỉ có các tính năng đọc thêm xóa sửa các nhân viên đơn giản. Đây là dự án kết hợp Spring Boot + Spring MVC + Spring Data Hibernate + Thymeleaf Template engine
Yêu cầu công cụ(hoặc công cụ lập trình khác tương tự):
Elipse + Plugin spring suite tool
Java + Tomcat
MySql
Các bước lập trình Spring Boot CRUD làm như sau ( để chi tiết hơn hãy xem video cuối bài )
Tạo Cơ sở dữ liệu
Ở đây mình sẽ tạo database là myemployee có 1 bảng employee. Trong bảng này sẽ có 3 cột: id, name, phone. Đoạn code tạo bảng:
create table employee(
 id int(10) not null auto_increment PRIMARY key,
 name nvarchar(100) not null,
 phone varchar(13) null
)
Tạo project spring boot mới:
File -> New -> Spring Starter Project
Nhập Group và Artifact tùy ý bạn. Ở đây mình nhập: Group là com.example, Package là com.example.demo và Artifact là MyEmployee

Nhấn Next, bây giờ ta sẽ thêm các thư viện: nhập “web” để tìm thêm thư viện Spring boot trên web. Tương tự nhập: “JPA”, “MySQL”, “Thymeleaf” để thêm chúng vào project.

Nhấn Finish
Project sẽ được build. Sau khi tạo project xong sẽ có cây thư mục như hình.

Thêm thư viện pom.xml
Trong dự án này, mình sử dụng Bootstrap 3.3.7 và jQuery 1.12.4 nên chúng ta sẽ thêm vào pom.xml như sau:
<dependency>
   <groupId>org.webjars</groupId>
   <artifactId>bootstrap</artifactId>
   <version>3.3.7</version>
  </dependency>
  <dependency>
   <groupId>org.webjars</groupId>
   <artifactId>jquery</artifactId>
   <version>1.12.4</version>
  </dependency>
Lúc này file pom.xml sẽ có nội dung thế này, bao gồm đã thêm thư viện Bootstrap và jquery (phần hightlight)
<?xml version="1.0" encoding="UTF-8"?>
<project xmlns="http://maven.apache.org/POM/4.0.0" xmlns:xsi="http://www.w3.org/2001/XMLSchema-instance"
 xsi:schemaLocation="http://maven.apache.org/POM/4.0.0 http://maven.apache.org/xsd/maven-4.0.0.xsd">
 <modelVersion>4.0.0</modelVersion>

 <groupId>com.example</groupId>
 <artifactId>MyEmployee</artifactId>
 <version>0.0.1-SNAPSHOT</version>
 <packaging>jar</packaging>

 <name>MyEmployee</name>
 <description>Demo project for Spring Boot</description>

 <parent>
  <groupId>org.springframework.boot</groupId>
  <artifactId>spring-boot-starter-parent</artifactId>
  <version>1.5.4.RELEASE</version>
  <relativePath /> <!-- lookup parent from repository -->
 </parent>

 <properties>
  <project.build.sourceEncoding>UTF-8</project.build.sourceEncoding>
  <project.reporting.outputEncoding>UTF-8</project.reporting.outputEncoding>
  <java.version>1.8</java.version>
 </properties>

 <dependencies>
  <dependency>
   <groupId>org.springframework.boot</groupId>
   <artifactId>spring-boot-starter-data-jpa</artifactId>
  </dependency>
  <dependency>
   <groupId>org.springframework.boot</groupId>
   <artifactId>spring-boot-starter-thymeleaf</artifactId>
  </dependency>
  <dependency>
   <groupId>org.springframework.boot</groupId>
   <artifactId>spring-boot-starter-web</artifactId>
  </dependency>

  <dependency>
   <groupId>mysql</groupId>
   <artifactId>mysql-connector-java</artifactId>
   <scope>runtime</scope>
  </dependency>
  <dependency>
   <groupId>org.springframework.boot</groupId>
   <artifactId>spring-boot-starter-test</artifactId>
   <scope>test</scope>
  </dependency>
  <dependency>
   <groupId>org.webjars</groupId>
   <artifactId>bootstrap</artifactId>
   <version>3.3.7</version>
  </dependency>
  <dependency>
   <groupId>org.webjars</groupId>
   <artifactId>jquery</artifactId>
   <version>1.12.4</version>
  </dependency>
 </dependencies>

 <build>
  <plugins>
   <plugin>
    <groupId>org.springframework.boot</groupId>
    <artifactId>spring-boot-maven-plugin</artifactId>
   </plugin>
  </plugins>
 </build>


</project>
Thiết lập project spring boot + hibernate + thymeleaf
Thiết lập file application.properties với hibernate và thymeleaf như sau:
# ===============================
# THYMELEAF
# ===============================
spring.thymeleaf.cache=false
# ===============================
# DATASOURCE
# ===============================

# Set here configurations for the database connection

# Connection url for the database
spring.datasource.url=jdbc:mysql://localhost:3306/myemployee?useSSL=false

# MySQL username and password
spring.datasource.username=root
spring.datasource.password=root

# Keep the connection alive if idle for a long time (needed in production)
spring.datasource.dbcp.test-while-idle=true
spring.datasource.dbcp.validation-query=SELECT 1

# ===============================
# JPA / HIBERNATE
# ===============================

# Use spring.jpa.properties.* for Hibernate native properties (the prefix is
# stripped before adding them to the entity manager).

# Show or not log for each sql query
spring.jpa.show-sql=true

# Hibernate ddl auto (create, create-drop, update): with "update" the database
# schema will be automatically updated accordingly to java entities found in
# the project
spring.jpa.hibernate.ddl-auto=update

# Naming strategy
spring.jpa.hibernate.naming.strategy=org.hibernate.cfg.ImprovedNamingStrategy

# Allows Hibernate to generate SQL optimized for a particular DBMS
spring.jpa.properties.hibernate.dialect=org.hibernate.dialect.MySQL5Dialect
Chúng ta cần lưu ý đoạn code kết nối tới cơ sở dữ liệu này. Bao gồm database và user, password kết nối tới mysql server
# Connection url for the database
spring.datasource.url=jdbc:mysql://localhost:3306/myemployee?useSSL=false

# MySQL username and password
spring.datasource.username=root
spring.datasource.password=root
Tạo các class java cho project Spring Boot CRUD
Bắt tay vào tạo class thôi! Do project Spring Boot CRUD chúng ta làm theo mô hình Spring MVC nên cần có các phần (package):
- Model
- Repository
- Service
- Controller

Nội dung tương ứng với bảng đã tạo bên cơ sở dữ liệu như sau:
package com.example.demo.model;

import java.io.Serializable;

import javax.persistence.Column;
import javax.persistence.Entity;
import javax.persistence.GeneratedValue;
import javax.persistence.GenerationType;
import javax.persistence.Id;
import javax.persistence.Table;

@Entity
@Table(name = "employee")
public class Employee implements Serializable
 /**
  *
  */
 private static final long serialVersionUID = 1L;

 @Id
 @GeneratedValue(strategy=GenerationType.AUTO)
 @Column(name = "id", nullable = false)
 private int id;

 @Column(name = "name", nullable = false)
 private String name;

 @Column(name = "phone")
 private String phone;

 public Employee()
  super();


 public Employee(int id, String name, String phone)
  super();
  this.id = id;
  this.name = name;
  this.phone = phone;


 public int getId()
  return id;


 public void setId(int id)
  this.id = id;


 public String getName()
  return name;


 public void setName(String name)
  this.name = name;


 public String getPhone()
  return phone;


 public void setPhone(String phone)
  this.phone = phone;
Tiếp theo chúng ta tạo class EmployeeRepository.java trong package com.example.demo.repository
Nội dung EmployeeRepository.java được extends CrudRepository như sau:
package com.example.demo.repository;

import java.util.List;

import org.springframework.data.repository.CrudRepository;

import com.example.demo.model.Employee;

public interface EmployeeRepository extends CrudRepository<Employee, Integer>

 List<Employee> findByNameContaining(String q);
Tiếp đến chúng ta tạo interface EmployeeService.java và class EmployeeServiceImpl.java implements từ interface EmployeeService.java trong package com.example.demo.service
interface EmployeeService.java
package com.example.demo.service;
import java.util.List;
import com.example.demo.model.Employee;

public interface EmployeeService
 Iterable<Employee> findAll();

 List<Employee> search(String q);

 Employee findOne(int id);

 void save(Employee contact);

 void delete(int id);
class EmployeeServiceImpl.java
package com.example.demo.service;

import java.util.List;

import org.springframework.beans.factory.annotation.Autowired;
import org.springframework.stereotype.Service;

import com.example.demo.model.Employee;
import com.example.demo.repository.EmployeeRepository;

@Service
public class EmployeeServiceImpl implements EmployeeService
 @Autowired
 private EmployeeRepository employeeRepository;

 @Override
 public Iterable<Employee> findAll()
 return employeeRepository.findAll();


 @Override
 public List<Employee> search(String q)
 return employeeRepository.findByNameContaining(q);


 @Override
 public Employee findOne(int id)
 return employeeRepository.findOne(id);


 @Override
 public void save(Employee contact)
  employeeRepository.save(contact);


 @Override
 public void delete(int id)
  employeeRepository.delete(id);
Cuối cùng chúng ta tạo class EmployeeController.java trong package com.example.demo.controller
package com.example.demo.controller;

import javax.validation.Valid;

import org.springframework.beans.factory.annotation.Autowired;
import org.springframework.stereotype.Controller;
import org.springframework.ui.Model;
import org.springframework.validation.BindingResult;
import org.springframework.web.bind.annotation.GetMapping;
import org.springframework.web.bind.annotation.PathVariable;
import org.springframework.web.bind.annotation.PostMapping;
import org.springframework.web.bind.annotation.RequestParam;
import org.springframework.web.servlet.mvc.support.RedirectAttributes;

import com.example.demo.model.Employee;
import com.example.demo.service.EmployeeService;

@Controller
public class EmployeeController
 @Autowired
 private EmployeeService employeeService;

 @GetMapping("/employee")
 public String index(Model model)
  model.addAttribute("employees", employeeService.findAll());
  return "list";


 @GetMapping("/employee/create")
 public String create(Model model)
  model.addAttribute("employee", new Employee());
  return "form";


 @GetMapping("/employee/id/edit")
 public String edit(@PathVariable int id, Model model)
  model.addAttribute("employee", employeeService.findOne(id));
  return "form";


 @PostMapping("/employee/save")
 public String save(@Valid Employee employee, BindingResult result, RedirectAttributes redirect)
  if (result.hasErrors())
   return "form";

  employeeService.save(employee);
  redirect.addFlashAttribute("success", "Saved employee successfully!");
  return "redirect:/employee";


 @GetMapping("/employee/id/delete")
 public String delete(@PathVariable int id, RedirectAttributes redirect)
  employeeService.delete(id);
  redirect.addFlashAttribute("success", "Deleted employee successfully!");
  return "redirect:/employee";


 @GetMapping("/employee/search")
 public String search(@RequestParam("s") String s, Model model)
  if (s.equals(""))
   return "redirect:/employee";


  model.addAttribute("employees", employeeService.search(s));
  return "list";
Sau khi xong chúng ta sẽ được cấu trúc thư mục như thế này

Tạo giao diện View dùng thymeleaf template
Phần xử lý đã xong bây giờ chúng ta sẽ viết phần view. Các bạn thêm thư mục và các file html như hình trong thư mục src/main/resources

Chúng ta cần các trang: hiện danh sách nhân viên, trang thêm/sửa nhân viên. Ở đây chúng ta sẽ viết 3 file html chính: layout.html, form.html, list.html. Đồng thời thêm css cho giao diện trang web đẹp chút là file style.css trong thư mục static/css
Để tối ưu code giao diện view mình sẽ dùng fragment của thymeleaf nên chúng ta sẽ viết các phần như head, header và footer chung cho tất cả các trang và bỏ vào file layout.html
Nội dung layout.html
<!DOCTYPE html>
<html xmlns:th="http://www.thymeleaf.org">
<head th:fragment="head">
<meta charset="utf-8" />
<meta http-equiv="X-UA-Compatible" content="IE=edge" />
<meta name="viewport" content="width=device-width, initial-scale=1" />

<title>Spring MyEmployee</title>

<!-- Bootstrap -->
<link
 href="https://maxcdn.bootstrapcdn.com/bootstrap/3.3.7/css/bootstrap.min.css"
 th:href="@/webjars/bootstrap/3.3.7/css/bootstrap.min.css"
 rel="stylesheet" />
<!-- Custom style -->
<link href="../static/css/style.css" th:href="@/css/style.css"
 rel="stylesheet" />

<!-- jQuery (necessary for Bootstrap's JavaScript plugins) -->
<script
 src="https://ajax.googleapis.com/ajax/libs/jquery/1.12.4/jquery.min.js"
 th:src="@/webjars/jquery/1.12.4/jquery.min.js"></script>
<!-- Include all compiled plugins (below), or include individual files as needed -->
<script
 src="https://maxcdn.bootstrapcdn.com/bootstrap/3.3.7/js/bootstrap.min.js"
 th:src="@/webjars/bootstrap/3.3.7/js/bootstrap.min.js"></script>

<!-- HTML5 shim and Respond.js for IE8 support of HTML5 elements and media queries -->
<!-- WARNING: Respond.js doesn't work if you view the page via file:// -->
<!--[if lt IE 9]>
 <script src="https://oss.maxcdn.com/html5shiv/3.7.3/html5shiv.min.js"></script>
 <script src="https://oss.maxcdn.com/respond/1.4.2/respond.min.js"></script>
 <![endif]-->
</head>
<body>
 <nav th:fragment="header"
 class="navbar navbar-inverse navbar-fixed-top">
 <div class="container">
 <div class="navbar-header">
 <button type="button" class="navbar-toggle collapsed"
 data-toggle="collapse" data-target="#navbar" aria-expanded="false"
 aria-controls="navbar">
 <span class="sr-only">Toggle navigation</span>
 <span class="icon-bar"></span>
 <span class="icon-bar"></span>
 <span class="icon-bar"></span>
 </button>
 <a class="navbar-brand" th:href="@/employee">MyEmployee</a>
 </div>
 </div>
 </nav>

 <h1>Main content</h1>

 <footer th:fragment="footer" class="container">
 Copyright © 2017 QLam - ShareEverythings.com
 </footer>
</body>
</html>
Mình giải thích chút về đoạn code trên (1 phần thôi còn lại tương tự nhé)
<link href="../static/css/style.css"
th:href="@css/style.css" rel="stylesheet" />- Thuộc tính
hreflà của HTML5, cung cấp đường dẫn tới filestyle.csscho trình duyệt nếu như server chưa run. - Thuộc tính
th:hreflà của Thymeleaf, cung cấp đường dẫn tới filestyle.csscho trình duyệt khi server run.@mà một biểu thức SPeL xác định đường dẫn.
<script
src="https://maxcdn.bootstrapcdn.com/bootstrap/3.3.7/js/bootstrap.min.js"
th:src="@/webjars/bootstrap/3.3.7/js/bootstrap.min.js"></script>
Do bootstrap và jquery mình dùng file jar (nằm trong maven dependencies của project) nên sẽ có đường dẫn như sau
/webjars/<tên thư viện>/<phiên bản>Trang list.html sẽ là trang chủ và hiện danh sách nhân viên. Đồng thời hiện thông báo khi thêm/sửa/xóa nhân viên.
Nội dung list.html
<!DOCTYPE html>
<html xmlns:th="http://www.thymeleaf.org">
<head th:replace="layout :: head"></head>
<body>
 <nav th:replace="layout :: header"></nav>

 <div class="container main-content list">
  <div th:if="$success"
   class="row alert alert-success alert-dismissible">
   <button type="button" class="close" data-dismiss="alert"
    aria-label="Close">
    <span aria-hidden="true">×</span>
   </button>
   <span th:text="$success"></span>
  </div>
  <div class="row">
   <a th:href="@/employee/create" class="btn btn-success pull-left">
    <span class="glyphicon glyphicon-plus"></span> Add new employee
   </a>
   <form class="form-inline pull-right" action="#"
    th:action="@/employee/search" method="GET">
    <div class="form-group">
     <input type="text" class="form-control" name="s"
      placeholder="Type employee name..." />
    </div>
    <button type="submit" class="btn btn-primary">Search</button>
   </form>
  </div>
  <th:block th:if="$#lists.isEmpty(employees)">
   <h3>No employee</h3>
  </th:block>

  <th:block th:unless="$#lists.isEmpty(employees)">
   <div class="row">
    <table class="table table-bordered table-hover">
     <thead>
      <tr>
       <th>No</th>
       <th>Name</th>
       <th>Phone</th>
       <th>Edit</th>
       <th>Delete</th>
      </tr>
     </thead>
     <tbody>
      <tr th:each="contact,iterStat : $employees">
       <td th:text="$iterStat.count"></td>
       <td th:text="$contact.name"></td>
       <td th:text="$contact.phone"></td>
       <td><a th:href="@/employee/id/edit(id=$contact.id)"><span
         class="glyphicon glyphicon-pencil"></span></a></td>
       <td><a th:href="@/employee/id/delete(id=$contact.id)"><span
         class="glyphicon glyphicon-trash"></span></a></td>
      </tr>
     </tbody>
    </table>
   </div>
  </th:block>
 </div>
 <!-- /.container -->

 <footer th:replace="layout :: footer"></footer>
</body>
</html>
Mình giải thích chút (1 phần thôi còn lại tương tự nhé)
<footer th:replace="layout :: footer"></footer>layoutlà tham chiếu tới filelayout.htmlhead,headervàfootersau::là các fragment selector, chính là giá trị của thuộc tínhth:fragmentcủa các thẻhead,navvàfooterở filelayout.html
- Thuộc tính
th:eachtương ứng với “câu lệnh foreach” - Thuộc tính
th:textdùng để đổ dữ liệu dưới dạng text vào thẻ HTML $contactslà một iterated variable, chính là đối tượngcontactstruyền từ Controllercontactlà một iteration variableiterStatlà một status variable giúp chúng ta theo dõi vòng lặp, biếncountsẽ lấy ra chỉ số hiện tại của vòng lặp (bắt đầu từ 1)
Nội dung form.html
<!DOCTYPE html>
<html xmlns:th="http://www.thymeleaf.org">
<head th:replace="layout :: head"></head>
<body>
 <nav th:replace="layout :: header"></nav>

 <div class="container main-content form">
 <div class="row">
 <form action="#" th:action="@/employee/save" th:object="$employee"
   method="POST" novalidate="novalidate">
   <input type="hidden" th:field="*id" />
   <div class="form-group">
   <label>Name</label>
   <input type="text" class="form-control"
   th:field="*name" />
   </div>
   <div class="form-group">
   <label>Phone</label>
   <input type="text" class="form-control" th:field="*phone" />
   </div>
   <button type="submit" class="btn btn-primary">Save</button>
  </form>
 </div>
 </div><!-- /.container -->

 <footer th:replace="layout :: footer"></footer>
</body>
</html>
Mình giải thích chút (1 phần thôi còn lại tương tự nhé)
Mỗi thuộc tính của employee sẽ tương ứng với một input trong form. Nên mình sẽ thêm thuộc tính
th:field=*fieldName vào các input. Do khi submit form, chúng ta cần phải chỉ cho Hibernate biết entity nào được ánh xạ qua(mapping), ví dụ <input type="hidden" th:field="*id" /> để chỉ ra ID của entity Employee.Nội dung style.css
.main-content
 min-height: 500px;
 max-width: 700px;
 margin-top: 70px;


.list
 max-width: 800px;


.form
 max-width: 450px;


.row
 margin-top: 30px;


.table th, td
 text-align: center;


.field-error
 border: 1px solid #ff0000;
 margin-bottom: 10px;
Xong. Mọi thứ đã ổn chạy chương trình thôi nào ! Nhấn phải project chọn Run as -> Spring Boot App. Vào trình duyệt web gõ: localhost:8080/employee (hoặc cổng port của bạn). “/employee” do bạn đã thiết lập trong controller.

Kết quả: Lập trình Spring Boot CRUD đơn giản MyEmployee

Download source code
Video hướng dẫn chi tiết Lập trình Spring Boot CRUD đơn giản MyEmployee
Link Source: Lập trình Spring Boot CRUD đơn giản MyEmployee
