Lập trình Hello World trong Spring boot với JSP View
Link Source: https://shareeverythings.com/lap-trinh/java/lap-trinh-hello-world-trong-spring-boot-voi-jsp-view/
Thể loại: Java, Lập trình
Tags: Lập trình, Spring Framework

Hướng dẫn lập trình in ra dòng chữ hello world đơn giản cho project java Spring boot với giao diện view là jsp.
Yêu cầu công cụ(hoặc công cụ lập trình khác tương tự):
Elipse + Plugin spring suite tool
Java + Tomcat
Các bước làm như sau ( để chi tiết hơn hãy xem video cuối bài )
File -> New -> Spring Starter Project
Nhập Group và Artifact tùy ý bạn. Ở đây tôi nhập: Group là com.example và Artifact là demosimplehello
Nhấn Next sau đó nhập “web” để tìm thêm thư viện Spring boot trên web
Nhấn Finish
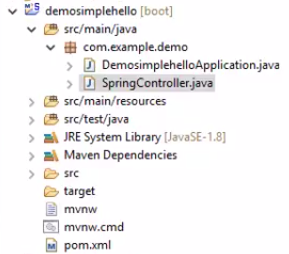
Project sẽ được build. Sau khi tạo project xong sẽ có file DemosimplehelloApplication.java như hình.

Mở file pom.xml thêm các dependency như sau:
Tiếp theo tạo file SpringController.java cùng package với file DemosimplehelloApplication.java
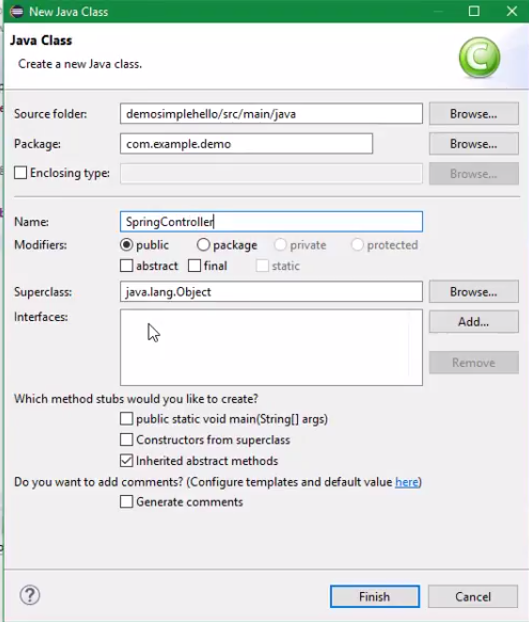
Thêm nội dung vào file SpringController.java như sau
Ở đây chỉ khai báo biến là “message” để in ra màn hình. Dùng @RequestMapping(“/”) để mặc định chạy hàm hello khi người dùng chạy localhost:8080. Trong hàm này tôi return về “welcome” đây là trang jsp view lát nữa chúng ta sẽ tạo nó. Tôi truyền dữ liệu sang jsp view thông qua kiểu dữ liệu Map<key,value> tên là model.
Trước khi tạo file giao diện ta phải cấu hình liên kết giữa view và controller qua file application.properties

Tham sốprefix để trỏ tới thư mục view mà ta return “welcome” trong file SpringController.java
Suffix chỉ là định dạng file view ở đây là .jsp
Tạo đường dẫn thư mục src/main/webapp/WEB-INF/jsp và file welcome.jsp như hình
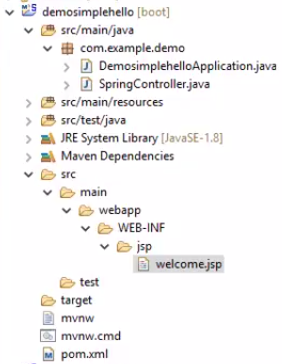
Nội dung file welcome.jsp
Chúng ta bổ sung các file thư viện css hay js vào đường dẫn src/main/resources/static ở đây tôi tạo thư mục css chứa file main.css
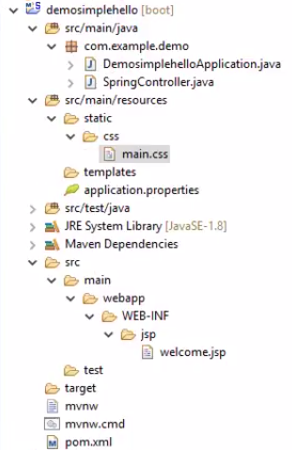
Nội dung file main.css
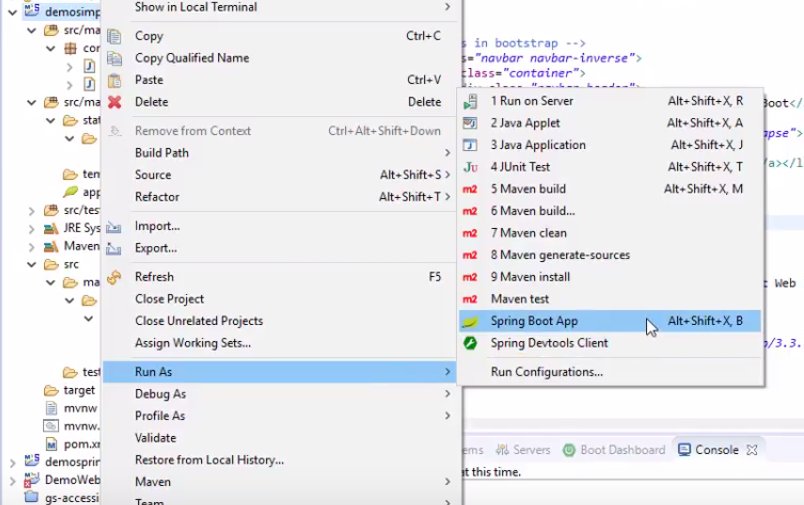
Xong rồi. Chúng ta chạy chương trình lên. Sau đó vào trình duyệt gõ localhost:8080 (tùy cổng port của bạn).

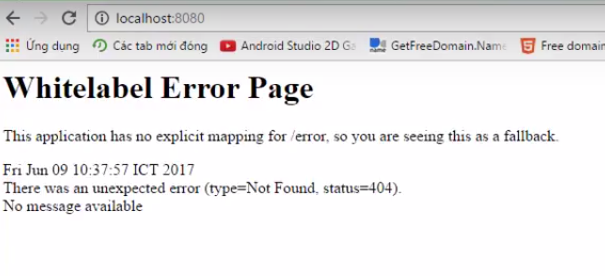
Nếu bị lỗi này bạn hãy xem lại đã cấp hình cho file application.properties chưa.
Link Source: https://shareeverythings.com/lap-trinh/java/lap-trinh-hello-world-trong-spring-boot-voi-jsp-view/
Thể loại: Java, Lập trình
Tags: Lập trình, Spring Framework
Lập trình Hello World trong Spring boot với JSP View

Hướng dẫn lập trình in ra dòng chữ hello world đơn giản cho project java Spring boot với giao diện view là jsp.
Yêu cầu công cụ(hoặc công cụ lập trình khác tương tự):
Elipse + Plugin spring suite tool
Java + Tomcat
Các bước làm như sau ( để chi tiết hơn hãy xem video cuối bài )
Tạo project spring boot mới:
File -> New -> Spring Starter Project
Nhập Group và Artifact tùy ý bạn. Ở đây tôi nhập: Group là com.example và Artifact là demosimplehello
Nhấn Next sau đó nhập “web” để tìm thêm thư viện Spring boot trên web
Nhấn Finish
Project sẽ được build. Sau khi tạo project xong sẽ có file DemosimplehelloApplication.java như hình.

Khai báo thư viện trong file pom.xml
Mở file pom.xml thêm các dependency như sau:
<dependencies>
  <dependency>
   <groupId>org.springframework.boot</groupId>
   <artifactId>spring-boot-starter-web</artifactId>
  </dependency>

  <dependency>
   <groupId>org.springframework.boot</groupId>
   <artifactId>spring-boot-starter-test</artifactId>
   <scope>test</scope>
  </dependency>

  <!-- Tomcat embedded container -->
  <dependency>
   <groupId>org.springframework.boot</groupId>
   <artifactId>spring-boot-starter-tomcat</artifactId>
   <scope>provided</scope>
  </dependency>

  <!-- JSTL for JSP -->
  <dependency>
   <groupId>javax.servlet</groupId>
   <artifactId>jstl</artifactId>
  </dependency>

  <!-- Need this to compile JSP -->
  <dependency>
   <groupId>org.apache.tomcat.embed</groupId>
   <artifactId>tomcat-embed-jasper</artifactId>
   <scope>provided</scope>
  </dependency>

  <!-- Need this to compile JSP, tomcat-embed-jasper version is not working,
   no idea why -->
  <dependency>
   <groupId>org.eclipse.jdt.core.compiler</groupId>
   <artifactId>ecj</artifactId>
   <version>4.6.1</version>
   <scope>provided</scope>
  </dependency>
  <!-- Optional, test for static content, bootstrap CSS -->
  <dependency>
   <groupId>org.webjars</groupId>
   <artifactId>bootstrap</artifactId>
   <version>3.3.7</version>
  </dependency>
 </dependencies>
Tiếp theo tạo file SpringController.java cùng package với file DemosimplehelloApplication.java


Thêm nội dung vào file SpringController.java như sau
@Controller
public class SpringController
 //@Value("$welcome.message:test")
 private String message="Hello world";

 @RequestMapping("/")
 public String hello(Map<String, Object> model)
  model.put("message", this.message);
  return "welcome";
Ở đây chỉ khai báo biến là “message” để in ra màn hình. Dùng @RequestMapping(“/”) để mặc định chạy hàm hello khi người dùng chạy localhost:8080. Trong hàm này tôi return về “welcome” đây là trang jsp view lát nữa chúng ta sẽ tạo nó. Tôi truyền dữ liệu sang jsp view thông qua kiểu dữ liệu Map<key,value> tên là model.
Khởi tạo view file giao diện
Trước khi tạo file giao diện ta phải cấu hình liên kết giữa view và controller qua file application.properties

spring.mvc.view.prefix: /WEB-INF/jsp/
spring.mvc.view.suffix: .jsp
Tham sốprefix để trỏ tới thư mục view mà ta return “welcome” trong file SpringController.java
Suffix chỉ là định dạng file view ở đây là .jsp
Tạo đường dẫn thư mục src/main/webapp/WEB-INF/jsp và file welcome.jsp như hình

Nội dung file welcome.jsp
<!DOCTYPE html>
<%@ taglib prefix="spring" uri="http://www.springframework.org/tags"%>
<%@ taglib prefix="c" uri="http://java.sun.com/jsp/jstl/core"%>
<html lang="en">
<head>

 <!-- Access the bootstrap Css like this,
  Spring boot will handle the resource mapping automcatically -->
 <link rel="stylesheet" type="text/css" href="webjars/bootstrap/3.3.7/css/bootstrap.min.css" />
 <link href="/css/main.css" rel="stylesheet" />

</head>
<body>
 <!-- Class in bootstrap -->
 <nav class="navbar navbar-inverse">
  <div class="container">
   <div class="navbar-header">
    <a class="navbar-brand" href="#">Spring Boot</a>
   </div>
   <div id="navbar" class="collapse navbar-collapse">
    <ul class="nav navbar-nav">
     <li class="active"><a href="#">Home</a></li>
     <li><a href="#about">About</a></li>
    </ul>
   </div>
  </div>
 </nav>

 <div class="container">
   <h1>Welcome to Share Everything - Spring Boot Web JSP Simple Example</h1>
   <h2>Message: $message</h2>
 </div>

 <script type="text/javascript" src="webjars/bootstrap/3.3.7/js/bootstrap.min.js"></script>

</body>

</html>
Chúng ta bổ sung các file thư viện css hay js vào đường dẫn src/main/resources/static ở đây tôi tạo thư mục css chứa file main.css

Nội dung file main.css
h1{
 color:#0000FF;}

h2{
 color:#FF0000;}
Xong rồi. Chúng ta chạy chương trình lên. Sau đó vào trình duyệt gõ localhost:8080 (tùy cổng port của bạn).

Kết quả Spring boot web jsp

Nếu bị lỗi này bạn hãy xem lại đã cấp hình cho file application.properties chưa.

Video hướng dẫn chi tiết Hello World với Spring boot và jsp view
Download project tại đây
Link Source: https://shareeverythings.com/lap-trinh/java/lap-trinh-hello-world-trong-spring-boot-voi-jsp-view/
